
Blinds Installation Mistakes That Make Your Windows Look Cheap (And How to Avoid Them)
Introduction: Why Proper Blinds Installation Matters for Your Home’s Look and Value
A well-fitted set of blinds can make a room feel polished and inviting. A poorly installed one? Crooked lines, awkward gaps, and constant adjustments that drive you mad. In homes across Middletwon, DE, from modern condos to historic waterfront houses, details like accurate measuring, correct mounting, and solid hardware decide whether your windows look high-end or unfinished.
Proper window blinds installation isn’t just about hanging a product; it’s about blending style, privacy, light control, and energy efficiency into one seamless finish.
Common Blinds Installation Mistakes Homeowners Make
Even the most expensive blinds can look bargain-bin if the installation goes wrong. Here’s where most homeowners slip up and how to avoid ending up with cheap-looking windows.
Incorrect Measurements That Lead to Awkward Gaps
A single measuring error can turn your blinds into privacy nightmares. Too narrow, and you’ll see strips of light and exposed glass; too wide, and the slats scrape the frame every time you open or close them. The fix is simple: use a blinds measuring guide and check the width, height, and depth in at least three places. For width, take the smallest number; for height, use the largest. This ensures a snug fit, whether you’re going for inside mount blinds or a wider outside mount.
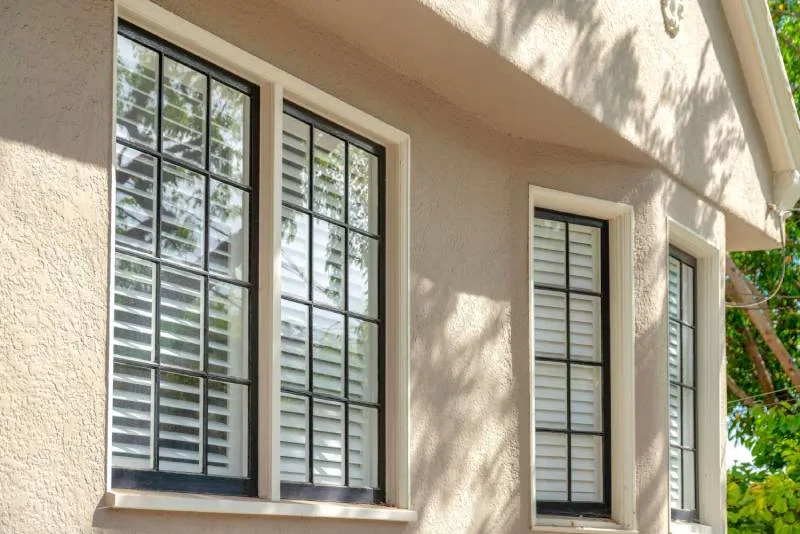
Choosing the Wrong Mounting Style for the Window Type
The inside vs. outside mount decision isn’t just an aesthetic choice; it affects light control, frame visibility, and installation stability. Inside mounts give a sleek, built-in appearance but need enough depth of the window frame for proper mounting brackets. Outside mounts are great for hiding damaged trim and blocking extra light, but if oversized, they can overwhelm smaller windows. A quick consultation with a professional blind installer can help avoid mismatched proportions.
Failing to Level the Blinds During Installation
Crooked blinds instantly signal bad workmanship. Even slight uneven bracket alignment will make them hang at an angle, ruining the clean lines. A level tool isn’t optional; it’s your best friend for getting installation alignment right the first time.
Ignoring the Manufacturer’s Instructions
Every window blinds installation brand uses slightly different hardware, tension settings, and cord safety designs. Skipping the instruction sheet may seem like a time-saver, but it often leads to misaligned blinds or mechanical issues that require a complete reinstallation, and can void your warranty.
Using Low-Quality or Mismatched Hardware
Your blinds are only as strong as what holds them up. Weak screws, bent mounting brackets, or visible mismatched parts will cheapen the look and shorten their lifespan. Follow athe installation tool checklist and invest in proper-grade materials so your blinds stay sturdy, safe, and polished.
How to Install Blinds Correctly for a Polished, Professional Look
Installing blinds isn’t just about getting them on the wall, it’s about precision, proportion, and polish. Follow these steps to ensure your window shutters installation looks high-end and works flawlessly.
Step 1: Accurate Measuring for a Perfect Fit
Precision starts with the right tools. A steel tape measure gives exact readings, unlike fabric ones that can stretch. For inside-mount blinds, check the depth of the window frame to ensure the headrail sits flush without protruding. In older homes, especially those around Middletwon, DE, frames can be slightly out of square, so measure width, height, and depth in multiple spots before ordering.
Step 2: Choosing the Right Blind Style and Mounting Position
The style and mount should match the room’s purpose. Roller blinds are great for kitchens where cleaning is frequent, Venetian blinds provide adjustable light in living rooms, and cellular shades offer insulation for bedrooms. The inside vs. outside mount choice should also reflect your needs: inside for a built-in look, outside for maximum light blockage or to cover uneven trim.
Step 3: Prepping the Window Area Before Installation
A clean surface makes for a stable install. Remove dust, old screws, or debris from previous fixtures. Fill in the unused holes and sand the rough edges so that the brackets sit flush. Mark drill points precisely using a pencil and level tool; it saves time correcting mistakes later.
Step 4: Installing and Leveling the Brackets
Bracket placement is everything for proper installation alignment. Use a level to ensure both sides are perfectly even, mark your spots, then drill pilot holes to prevent wood splitting. Secure the mounting brackets firmly so the blinds won’t wobble or sag over time.
Step 5: Attaching the Blinds and Testing Operation
Whether you’re snapping in a headrail or screwing in a roller tube, follow the manufacturer’s instructions for your specific model. Once attached, raise and lower the blinds several times to check for smooth movement, even roll, and no scraping against the frame.
The Benefits of Getting Blinds Installation Right the First Time
When blinds are installed with precision, the difference is instantly visible, and it’s not just about looks. Proper window shade installation gives you smooth operation, clean alignment, and the exact level of light control you want in each room.
A correct fit also plays a role in energy efficiency. In summer, well-fitted blinds reduce heat gain and protect interiors from UV damage. In winter, they help retain warmth, cutting down on heating costs. Beyond comfort, they can subtly boost property value, since potential buyers notice details like straight, gap-free window treatments.
Choosing professional blind installation services means you get the benefit of advanced tools and techniques. At Meticulous Blinds, our team uses laser levels for perfect bracket alignment, measures down to the millimeter for custom-fit blinds, and tests every unit to ensure flawless operation before leaving your home.
Real-Life Scenarios: When Bad Installation Ruined the Look
Even the most expensive custom window treatments can look wrong if the basics are skipped. In one Middletown, DE home, a set of high-end roller blinds was ordered without checking the window frame depth. They stuck out past the trim, scraped the edges, and lost that sleek, built-in look the homeowner wanted.
At a waterfront property, outdoor-facing blinds were installed with slight bracket misalignment. From inside, it seemed minor, but from the street, the blinds appeared to sag on one side, ruining the home’s curb appeal. Both projects ended up needing a full removal and reinstallation, doubling the cost and extending the timeline, a mistake that could have been avoided with accurate measurements and proper leveling from the start.
Local Insight – Why Middletown, DE Homes Need Special Attention with Blinds
Middletown, DE’ mix of historic architecture and waterfront living brings unique challenges to blinds installation. The coastal climate means constant exposure to humidity, which can cause wood blinds to swell and hardware to corrode. Using stainless steel or rust-resistant brackets is essential for long-term durability.
Older, historic homes often have non-square window openings and shifting frames, so installers need to adjust each mount for a level appearance, even when the structure isn’t perfectly aligned. In contrast, large-span windows in modern waterfront properties demand reinforced mounting points and proper weight load distribution so heavier blinds don’t sag or pull away from the wall over time. By tailoring material choices, mounting methods, and hardware selection to local conditions, you get blinds that look sharp and operate smoothly year after year, no matter the weather.
Actionable Tips to Avoid Blinds Installation Disasters
A perfect fit starts long before the drill comes out. Always take multiple measurements, width, height, and frame depth at different points, and write them down before placing an order.
Use the right installation tools for the job: a steel tape measure for accuracy, a power drill for clean holes, a level for straight lines, and appropriate wall anchors or screws based on whether you’re mounting into wood, plaster, or drywall.
Bracket positioning is everything. Mark locations carefully, check them against your measurements, and confirm both sides align before tightening any screws. If a step feels uncertain, don’t guess. Calling in a professional blinds installer can save you the headache of uneven mounts, damaged frames, or blinds that never quite work right
Conclusion
Blinds aren’t just window coverings, they’re part of your home’s personality. The right fit, style, and installation can transform a room from ordinary to impressive, while mistakes like poor measurements, weak hardware, or crooked brackets can drag the entire look down. In Annapolis, where historic charm meets coastal conditions, paying attention to the details is even more critical.
From resisting humidity to handling uneven frames, every step matters. Whether you go the DIY route or hire seasoned professionals like Meticulous Blinds, the goal is the same: blinds that operate flawlessly, align perfectly, and complement your home’s design for years to come.
FAQs
Q1: How long does professional curtain installation take?
Most standard curtain installations take 30–60 minutes per window. Complex setups, like motorized tracks or bay windows, can take longer due to precision measurements and hardware adjustments.
Q2: Can you install curtains on tricky surfaces like concrete or metal?
Yes. Professional installers use specialized tools and anchors designed for challenging surfaces such as concrete, brick, or metal, ensuring a secure and lasting fit.
Q3: What if my curtains are uneven after installation?
Uneven curtains usually result from imbalanced brackets or misaligned rods. A professional can quickly re-measure, level the hardware, and ensure your curtains hang perfectly straight.
Q4: Do you remove old curtain rods before installing new ones?
Absolutely. Most installation services include the removal of existing rods and hardware, patching of old holes, and preparation for your new setup.
Q5: Can I get help fixing curtain issues without replacing them?
Yes. Common problems like sagging rods, stuck tracks, or fabric bunching can often be fixed without replacing your curtains. A pro can troubleshoot and restore functionality.
Q6: Do you offer same-day curtain installation or repair?
In many areas, yes. Availability depends on booking schedules, but urgent installation or repair services can often be arranged for the same day.